Generation Loss – The Process
Before I could look at Generation Loss, I had to decide how to achieve this practically. In the case of of the Instagram reposting, this was one file type (jpg), how would other file types respond to Generation Loss and would this have an aesthetic bearing on the images. Each step in the Generation Loss project would need to cover, at least initially:
- Rotate the image 90 degrees save the image
- Repeat step 1, thousands of times
- Every 100 times, save a copy of the image
- Conduct the same Generation Loss process for differing file types
As I examined how this task was going to play out practically, it dawned on me I would not be able to complete this manually. My research had thrown up some interesting automated image manipulation ideas (http://snorpey.github.io/experiments/). Georg Fischer creates his own degeneration and prompts viewers to manipulate images directly. His ‘Glitch Experiments’ were really interesting, as he is to some degree looking for an aesthetic quality from degeneration and deconstruction and providing the viewer with the ability to control the effects of glitches upon the image of Lincoln (https://fishnation.de/):

So I set to work creating my own batch script (most of the batch scripts for Generation Loss I found which were publicly available, failed to work when I looked at them):
The code I have listed out below (Generation Loss Coding – Batch Script), for others to reuse as a shell script. It can be copied pasted into notepad directly and saved with an ‘.sh’ extension. It is written for Linux and would recommend anyone interested in repeating the Generation Loss process, installing the user friendly linux operating system ‘Linux Mint’ (https://www.linuxmint.com) and downloading and installing the free software programmes ‘ffmpeg’ and ‘Handbrake’ to batch process Generation Loss.
Generation Timing and File Formats
In testing, the jpg format degrades to a complete grey in around 4200 iterations, however, other formats which degrade much more quickly provided more interesting results with blues and pinks stylising the images. Webp format in particular provided lovely degradation images in 1000 iterations and fully degrading at 1200 iterations. In looking at the results of the scripts, I then amended it to create a time-lapse showing degradation over time (included in the coding below). I followed this by compressing the video sizes using ‘Handbrake’, as the 20 second videos were initially >380MB. I found a frame rate of 2 (2 frames per second), yielded best results, as this visualises the degradation rates of different formats well (much longer for colour jpg at 4200 iterations, B&W jpg at 3100 iterations and shorter for webp, 1200 iterations).
Generation Loss – Test conclusions
The iterative process of running code to generate >4200 iterations and create time-lapse video took 40 minutes on a modern i7 laptop per base test image. The generation loss in jpg formats move to a complete grey mass over time, while other formats have more interesting colour shift and patterning such as webp. I wanted a strong aesthetic quality to the images and decided my Generation Loss project would therefore focus on only two file formats jpg (4200 iterations) and webp (1200 iterations).
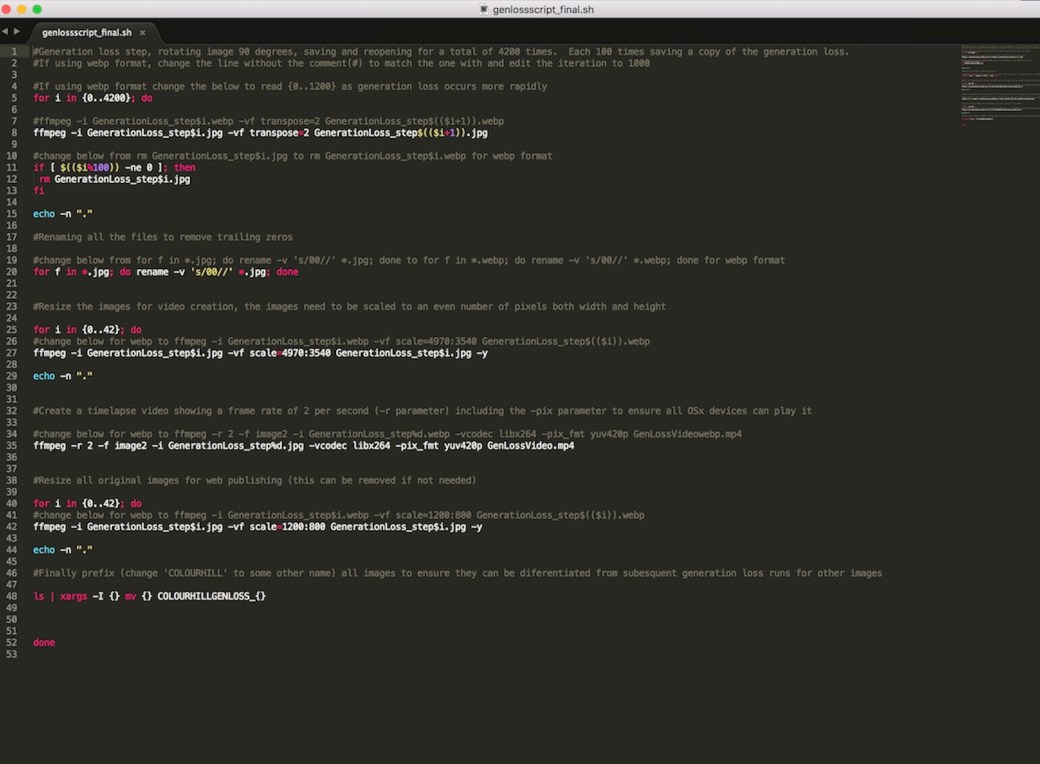
Generation Loss Coding – Batch Script – Copy below and save with ‘.sh’ extension via notepad
#Generation loss step, rotating image 90 degrees, saving and reopening for a total of 4200 times. Each 100 times saving a copy of the generation loss.
#If using webp format, change the line without the comment(#) to match the one with and edit the iteration to 1000
#If using webp format change the below to read {0..1200} as generation loss occurs more rapidly
for i in {0..4200}; do
#ffmpeg -i GenerationLoss_step$i.webp -vf transpose=2 GenerationLoss_step$(($i+1)).webp
ffmpeg -i GenerationLoss_step$i.jpg -vf transpose=2 GenerationLoss_step$(($i+1)).jpg
#change below from rm GenerationLoss_step$i.jpg to rm GenerationLoss_step$i.webp for webp format
if [ $(($i%100)) -ne 0 ]; then
rm GenerationLoss_step$i.jpg
fi
echo -n “.”
#Renaming all the files to remove trailing zeros
#change below from for f in *.jpg; do rename -v ‘s/00//’ *.jpg; done to for f in *.webp; do rename -v ‘s/00//’ *.webp; done for webp format
for f in *.jpg; do rename -v ‘s/00//’ *.jpg; done
#Resize the images for video creation, the images need to be scaled to an even number of pixels both width and height
for i in {0..42}; do
#change below for webp to ffmpeg -i GenerationLoss_step$i.webp -vf scale=4970:3540 GenerationLoss_step$(($i)).webp
ffmpeg -i GenerationLoss_step$i.jpg -vf scale=4970:3540 GenerationLoss_step$i.jpg -y
echo -n “.”
#Create a timelapse video showing a frame rate of 2 per second (-r parameter) including the -pix parameter to ensure all OSx devices can play it
#change below for webp to ffmpeg -r 2 -f image2 -i GenerationLoss_step%d.webp -vcodec libx264 -pix_fmt yuv420p GenLossVideowebp.mp4
ffmpeg -r 2 -f image2 -i GenerationLoss_step%d.jpg -vcodec libx264 -pix_fmt yuv420p GenLossVideo.mp4
#Resize all original images for web publishing (this can be removed if not needed)
for i in {0..42}; do
#change below for webp to ffmpeg -i GenerationLoss_step$i.webp -vf scale=1200:800 GenerationLoss_step$(($i)).webp
ffmpeg -i GenerationLoss_step$i.jpg -vf scale=1200:800 GenerationLoss_step$i.jpg -y
echo -n “.”
#Finally prefix (change ‘COLOURHILL’ to some other name) all images to ensure they can be diferentiated from subesquent generation loss runs for other images
ls | xargs -I {} mv {} COLOURHILLGENLOSS_{}
done
Criteria: 1, 2, 3 & 4
